Suelo recibir muchas preguntas sobre cómo usar Puppeteer-Sharp en Docker. Vamos a ver si podemos lanzar un:
Veamos el ejemplo que nos da Puppeteer y analisemos que cambios necesitamos hacer para que funcione con Puppeteer-Sharp.
FROM node:10-slim

# Install latest chrome dev package and fonts to support major charsets (Chinese, Japanese, Arabic, Hebrew, Thai and a few others)
# Note: this installs the necessary libs to make the bundled version of Chromium that Puppeteer
# installs, work.
RUN wget -q -O - https://dl-ssl.google.com/linux/linux_signing_key.pub | apt-key add - \
    && sh -c 'echo "deb [arch=amd64] http://dl.google.com/linux/chrome/deb/ stable main" >> /etc/apt/sources.list.d/google.list' \
    && apt-get update \
    && apt-get install -y google-chrome-unstable fonts-ipafont-gothic fonts-wqy-zenhei fonts-thai-tlwg fonts-kacst fonts-freefont-ttf \
      --no-install-recommends \
    && rm -rf /var/lib/apt/lists/*

# If running Docker >= 1.13.0 use docker run's --init arg to reap zombie processes, otherwise
# uncomment the following lines to have `dumb-init` as PID 1
# ADD https://github.com/Yelp/dumb-init/releases/download/v1.2.0/dumb-init_1.2.0_amd64 /usr/local/bin/dumb-init
# RUN chmod +x /usr/local/bin/dumb-init
# ENTRYPOINT ["dumb-init", "--"]

# Uncomment to skip the chromium download when installing puppeteer. If you do,
# you'll need to launch puppeteer with:
#     browser.launch({executablePath: 'google-chrome-unstable'})
# ENV PUPPETEER_SKIP_CHROMIUM_DOWNLOAD true

# Install puppeteer so it's available in the container.
RUN npm i puppeteer \
    # Add user so we don't need --no-sandbox.
    # same layer as npm install to keep re-chowned files from using up several hundred MBs more space
    && groupadd -r pptruser && useradd -r -g pptruser -G audio,video pptruser \
    && mkdir -p /home/pptruser/Downloads \
    && chown -R pptruser:pptruser /home/pptruser \
    && chown -R pptruser:pptruser /node_modules

# Run everything after as non-privileged user.
USER pptruser

CMD ["google-chrome-unstable"]
FROM
Comencemos cambiando la imagen. En lugar de:
FROM node:10-slim
Usemos:
FROM mcr.microsoft.com/dotnet/core/runtime:2.1
La versión menor no nos debería importar. Podríamos usar 2.0, 2.1 o 2.2,
La receta principal
Esta es la receta principal en Puppeteer:
# Install latest chrome dev package and fonts to support major charsets (Chinese, Japanese, Arabic, Hebrew, Thai, and a few others)
# Note: this installs the necessary libs to make the bundled version of Chromium that Puppeteer
# installs, work.
RUN wget -q -O - https://dl-ssl.google.com/linux/linux_signing_key.pub | apt-key add - \
    && sh -c 'echo "deb [arch=amd64] http://dl.google.com/linux/chrome/deb/ stable main" >> /etc/apt/sources.list.d/google.list' \
    && apt-get update \
    && apt-get install -y google-chrome-unstable fonts-ipafont-gothic fonts-wqy-zenhei fonts-thai-tlwg fonts-kacst fonts-freefont-ttf \
      --no-install-recommends \
    && rm -rf /var/lib/apt/lists/*

# If running Docker >= 1.13.0 use docker run's --init arg to reap zombie processes, otherwise
# uncomment the following lines to have `dumb-init` as PID 1
# ADD https://github.com/Yelp/dumb-init/releases/download/v1.2.0/dumb-init_1.2.0_amd64 /usr/local/bin/dumb-init
# RUN chmod +x /usr/local/bin/dumb-init
# ENTRYPOINT ["dumb-init", "--"]

# Uncomment to skip the chromium download when installing puppeteer. If you do,
# you'll need to launch puppeteer with:
#     browser.launch({executablePath: 'google-chrome-unstable'})
# ENV PUPPETEER_SKIP_CHROMIUM_DOWNLOAD true

# Install Puppeteer, so it's available in the container.
RUN npm i puppeteer \
    # Add user so we don't need --no-sandbox.
    # same layer as npm install to keep re-chowned files from using up several hundred MBs more space
    && groupadd -r pptruser && useradd -r -g pptruser -G audio,video pptruser \
    && mkdir -p /home/pptruser/Downloads \
    && chown -R pptruser:pptruser /home/pptruser \
    && chown -R pptruser:pptruser /node_modules

# Run everything after as non-privileged user.
USER pptruser
Acá es donde empieza lo divertido. Si corremos ese setup, usando nuestra imagen de Docker, vamos a obtener un:
/bin/sh: 1: wget: not found E: gnupg, gnupg2 and gnupg1 do not seem to be installed, but one of them is required for this operation
Resulta ser que necesitamos correr esta línea antes de ese setup:
RUN apt-get update && apt-get -f install && apt-get -y install wget gnupg2 apt-utils
También necesitamos eliminar algunas cosas relacionadas a Node. Por ejemplo, podemos remover el npm i puppeteer y el && chown -R pptruser:pptruser /node_modules.
Nos quedaría algo así:
RUN groupadd -r pptruser && useradd -r -g pptruser -G audio,video pptruser \
    && mkdir -p /home/pptruser/Downloads \
    && chown -R pptruser:pptruser /home/pptruser
Bueno, al menos nuestra imagen compila.
Algunas cosas importantes acerca de esta receta:
Estamos descargando Chrome
Si nos fijamos bien, podemos ver que ya estamos descargando Chrome acá:
&& apt-get install -y google-chrome-unstable fonts-ipafont-gothic fonts-wqy-zenhei fonts-thai-tlwg fonts-kacst fonts-freefont-ttf \
Entonces no tenemos que usar BrowserFetcher en nuestra app. Esto es super importante porque BrowserFetch no descargaría una versión que funcione dentro de un Docker.
Entonces, ¿Cómo hacemos para que Puppeteer-Sharp use ese Chrome? Fácil, podemos configurar una variable de entorno:
ENV PUPPETEER_EXECUTABLE_PATH "/usr/bin/google-chrome-unstable"
Estamos creando un nuevo usuario.
No vamos a hablar del flag --no-sandbox en este post. Podes encontrar muchos posts en internet acerca de los pros y los contras de este flag. También podés leer la documentación oficial.
Por ahora, lo único que necesitamos saber es que tenemos dos maneras de configurar nuestra imagen:
Con –no-sandbox
Si te parece conveniente usar el flag `–no-sandbox´ en tu aplicación, porque vas a navegar un sitio que confiás, podés eliminar todo el setup relacionado a la creación del usuario.
Todo esto se eliminaría:
# Add user, so we don't need --no-sandbox.
# same layer as npm install to keep re-chowned files from using up several hundred MBs more space
RUN groupadd -r pptruser && useradd -r -g pptruser -G audio,video pptruser \
    && mkdir -p /home/pptruser/Downloads \
    && chown -R pptruser:pptruser /home/pptruser

# Run everything after as non-privileged user.
USER pptruser
Y necesitamos agregar el --no-sandbox en nuestra aplicación:
var launchOptions = new LaunchOptions
{
    Headless = true,
    Args = new[]
    {
        "--no-sandbox"
    }
};
Sin –no-sandbox
Sino querés usar el flag --no-sandbox, vas a tener que mantener todo lo relacionado con la creación del usuario. El problema es que si intentás ejecutar Chrome vas a obtener este error:
Failed to move to new namespace: PID namespaces supported, Network namespace supported, but failed: errno = Operation not permitted
Vas a encontrar muchos, muchos posts hablando sobre esto.
Yo encontré la solucion en este post.
Vamos a tener que correr docker usando el flag --security-opt=seccomp:unconfined
¿Qué más?
Después de realizar todo este setup, tenemos que hacer un deploy de nuestra aplicación a esa imagen. Podés copiar el código fuente y hacer el publish dentro de Docker o copiar un publish existente, algo como esto:
COPY bin/Release/netcoreapp2.1/publish/ /app/
ENTRYPOINT ["dotnet", "/app/PuppeteerSharpPdfDemo-Local.dll"]
Solución final
Así es como se ve nuestro Dockerfile ahora:
FROM mcr.microsoft.com/dotnet/core/runtime:2.1

#####################
#PUPPETEER RECIPE
#####################
# Install latest chrome dev package and fonts to support major charsets (Chinese, Japanese, Arabic, Hebrew, Thai and a few others)
# Note: this installs the necessary libs to make the bundled version of Chromium that Puppeteer
# installs, work.
RUN apt-get update && apt-get -f install && apt-get -y install wget gnupg2 apt-utils
RUN wget -q -O - https://dl-ssl.google.com/linux/linux_signing_key.pub | apt-key add - \
    && sh -c 'echo "deb [arch=amd64] http://dl.google.com/linux/chrome/deb/ stable main" >> /etc/apt/sources.list.d/google.list' \
    && apt-get update \
    && apt-get install -y google-chrome-unstable fonts-ipafont-gothic fonts-wqy-zenhei fonts-thai-tlwg fonts-kacst fonts-freefont-ttf \
      --no-install-recommends \
    && rm -rf /var/lib/apt/lists/*

# Add user, so we don't need --no-sandbox.
# same layer as npm install to keep re-chowned files from using up several hundred MBs more space
RUN groupadd -r pptruser && useradd -r -g pptruser -G audio,video pptruser \
    && mkdir -p /home/pptruser/Downloads \
    && chown -R pptruser:pptruser /home/pptruser

# Run everything after as non-privileged user.
USER pptruser
#####################
#END PUPPETEER RECIPE
#####################

ENV PUPPETEER_EXECUTABLE_PATH "/usr/bin/google-chrome-unstable"
COPY bin/Release/netcoreapp2.1/publish/ /app/
ENTRYPOINT ["dotnet", "/app/PuppeteerSharpPdfDemo-Local.dll"]
Demo
¿Funcionará?
Vamos a crear una aplicación de consola llamada PuppeteerSharpPdfDemo-Local:
class MainClass
{
    public static async Task Main(string[] args)
    {
        using (var browser = await Puppeteer.LaunchAsync(new LaunchOptions()
        {
            Headless = true
        }))
        using (var page = await browser.NewPageAsync())
        {
            await page.GoToAsync("https://www.hardkoded.com");
            Console.WriteLine(
                await page
                    .QuerySelectorAsync(".page-subheading")
                    .EvaluateFunctionAsync<string>("el => el.innerText"));
        }
    }
}
La publicamos:
dotnet publish PuppeteerSharpPdfDemo-Local.csproj -c Release
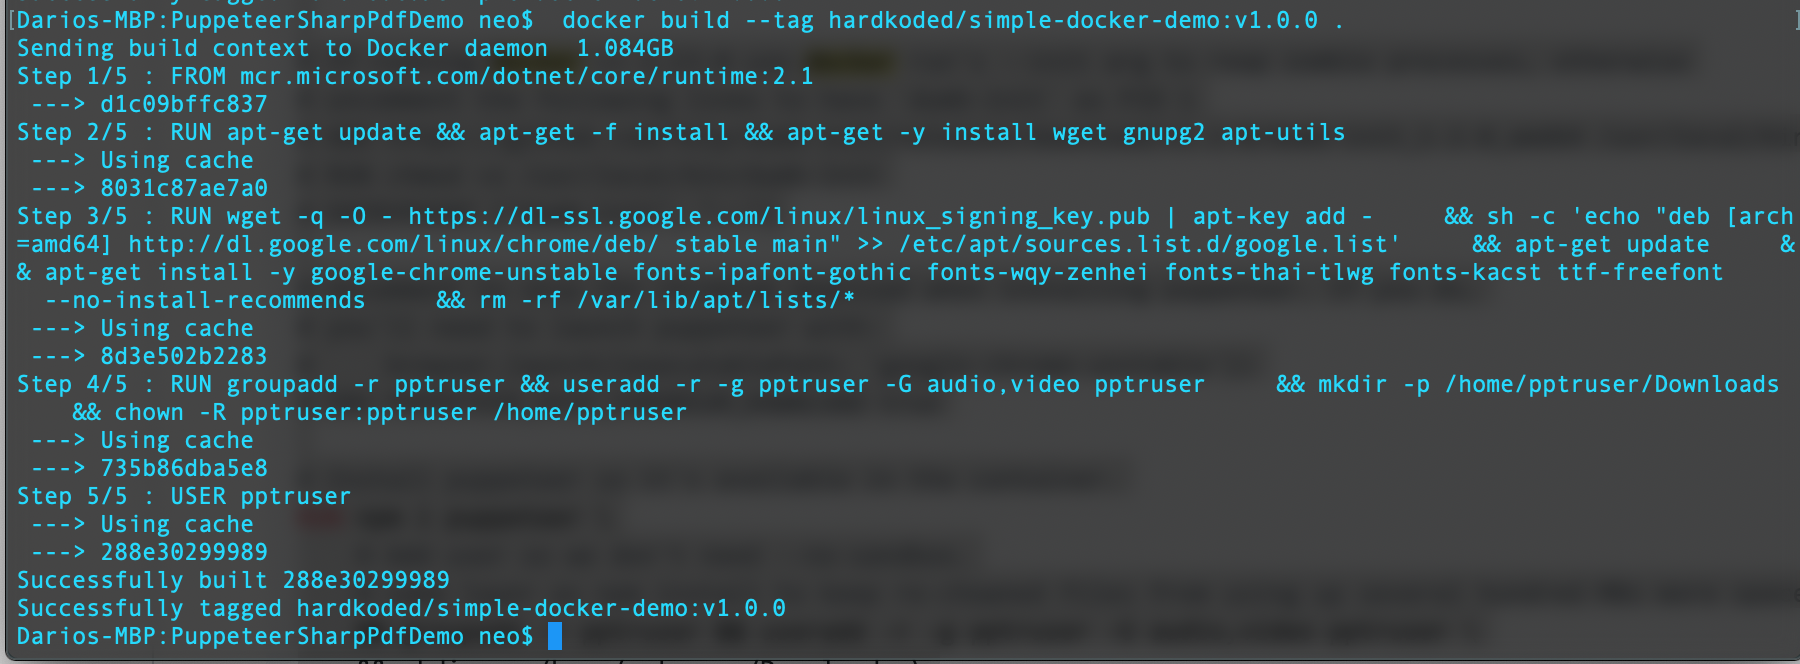
Compilamos la imagen de Docker:
docker build --tag hardkoded/simple-docker-demo:v1.0.0 .
¡A ejecutarla!
docker run --security-opt=seccomp:unconfined -it hardkoded/simple-docker-demo:v1.0.0

Palabras finales
Espero que este post les ayude a comenzar a utilizar Puppeteer-Sharp en Docker, obviamente, cualquier feedback o comentario de expertos en Docker va a ser bienvenido :)
No dejen de codear!